Have you ever had the feeling that your website is not being read as much as you would want it to?
Are you looking for a way to connect more readers to you?
In that case, I have a fantastic idea for you: create a knowledge base for your website.
It is an online encyclopedia with all kinds of articles about one topic or area of expertise. A collection of articles about one main topic.
The knowledge base forms a separate part of your blog, for example in your menu, your side bar, or at the bottom of your footer.
Over the past summer, I wrote about fifty articles myself to build up a knowledge base.
It is a knowledge base about Website tools.
Usually these are articles that are easy and quick to write. They are short, factual articles in which you explain something or describe what it is.
Yes, that is quite a job, but you will benefit from it for years. Now already after a month, I see the amount of visitors increase.
Why create a knowledge base for your website?
Lots of people are looking for basic information about a certain topic. Google is completely focused on that, to give people information that will help them towards reaching their goal.
When you create a knowledge base, you can also refer your own readers to it. You don’t have to explain what something means all the time, but you can simply link to it.
How do you build a knowledge base and what comes into account? I will give a step by step explanation to build a great knowledge base for your website.
1. Choose a knowledge base on which not much has been written about
If there are already three knowledge bases about ‘Internet Marketing’, it is better to go with another main topic.
WPjournalist is also a blog about WordPress and internet marketing, so I started looking for another angle.
The idea of creating a knowledge base about ‘Website tools’ came to mind quite fast.
From Google Analytics to Buffer; these are tools to make your website perform better.
It is also something I write about a lot on WPjournalist: How to get more out of your WordPress website. By using these website tools!
TIP: The main topic connects well to my website.
2. Choose a topic which is sought after a lot
You can go with a nice main topic, but if there is no demand, then it is quite pointless.
I notice that there is a lot of need for free tools to improve your website.
Besides that, I only wanted to describe tools that are (partly) free in my knowledge base.
That also gives added value to my visitors, as they usually have a limited budget to improve their website.
A knowledge base can be made for every branch.
- If you repair piano’s, you can make a knowledge base about anything that has to do with piano’s.
- If you teach yin yoga, you can tell all about this in your knowledge base. The terms that you are using, the developments, the kinds of movements etc.
3. Split the topic into categories
Once you have decided about which topic you are going to write, you make a list with the sub-topics you can write about.
I first wrote down about thirty website tools which I used myself: The google search string planner, the design program Canva; useful tools which I used a lot.
After I had about thirty, I could categorize them:
- Tools about building a website
- Tools about design
- Tools about SEO
- Etc
After a while, I had thought of 11 categories:

You can always add new categories later and expand it.
The good thing about WordPress is the fact that is also works with categories. I made a page with ‘Website Tools’ and put it in the navigation bar.
After that, you can make categories, such as ‘Website creating’, ‘design’, ‘email marketing’ etc.
Under each category you can then write a couple of articles.

And that’s how your knowledge base gets a thorough structure, in which readers can retrieve the different (sub)topics quickly.
On WPjournalist, I also presented the knowledge base as a separate part of the website. You can find the knowledge base in the navigation bar, the sidebar and in the footer.
You can put the following code into your footer/sidebar:
<a href=”https://wpjournalist.nl/category/website-tools/website-bouwen/”>Website bouwen</A><br>
<a href=”https://wpjournalist.nl/category/website-tools/social-media/”>Social media</A><br>
<a href=”https://wpjournalist.nl/category/website-tools/content-marketing/”>Content marketing</A><br>
<a href=”https://wpjournalist.nl/category/website-tools/seo/”>SEO</A><br>
<a href=”https://wpjournalist.nl/category/website-tools/beeld-fotografie/”>Beeld & fotografie</A><br>
etc.
Obviously, you do need to change the URLs into your own website domain.
4. Reserve a couple of months to write
It is quite a task to write all the articles for you knowledge base. Each article needs to have some body and I use a minimum of 300 words per article.
This is also what the Yoast SEO plugin advises; at least 300 words.
Don’t write forty articles in three days; it will put you off and it’s not good for the quality of the articles to write so many at once.
It is better to write one or two articles a day.
Within two months you will already have built a large knowledge base with about 50 articles.
50 x 300 words is about 15.000 words. That is quite an eBook…
5. Ensure good article optimization
Of course, the most important thing is that you write good content for your readers.
Also make sure your articles are optimized in a good manner. You have to use the right keywords for each article, ideally within the header.
These keywords are of course the things your readers search for in Google.
Also, within the articles in your knowledge base you need to link to other articles on your website as much as possible.
This way, it becomes an entire network consisting of referrals and it will be seen more as a whole. Which is something Google absolutely loves.
When you start writing your knowledge base articles, don’t wait until you have finished all of them. So don’t publish 40 articles on your website in one day.
It’s better to place one or two articles a day into your knowledge base. This way, you basically force Google to come by your website daily and index it again.
6. Edit your categories
Optimizing the categories is something many people don’t do. After you’ve created the categories, you can completely fill them in.
- name
- slug
- description
- etc.
Fill them out piece by piece, especially with the description it is important that this is done extensively. For some categories, I have made a description of about 200 words.
Next, you can optimize the text with SEO Yoast. Because with this plugin you can also optimize categories.
The optimizing contributes to strengthening the foundation of your knowledge base.
7. Pay attention to the layout
As said before, the knowledge base is a separate part of your website. And so it is recommended to also let this show in the layout.
I use the tool Canva to do this easily and fast.
With WPjournalist, the highlighted image of each article has a separate colour, depending on the sub-topic.
- The sub-topic SEO has a pink colour
- Content marketing has a light blue colour
- Hosting is brown
- etc.

Another difference: The highlighted image (above the article) is bigger compared to a regular blog.
There are a lot of knowledge bases with text only. I decided to also use images in combination with text. It makes it more clear and pleasant.
8. Bonus tip: Create reviews
As one of the only knowledge bases, I also use reviews. With each article in my knowledge base, I have added a website tool review.
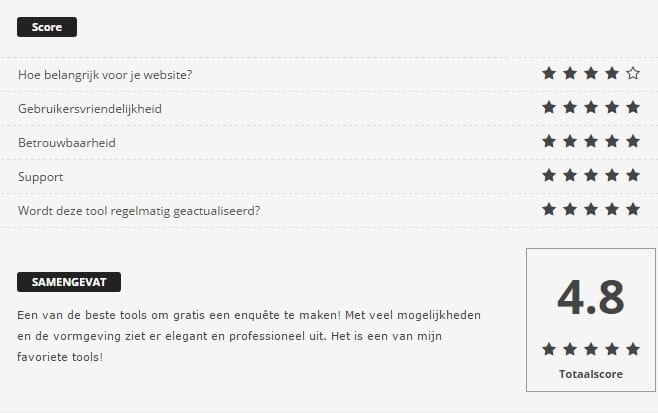
Note: not every knowledge base is suitable to give reviews. If you only give factual information, a review would not be appropriate.
But if you choose a main topic on which you can also give judgement, I would definitely add reviews.
Why?
Well, reviews get a remarkable reference in Google, stars:

Coincidentally, I also had the option to add reviews in my theme, but of course not every theme has this option.
In that case you can install a plugin to add reviews, like WP-Review.
9. Wait patiently…
Then comes the time to wait patiently.
Don’t expect to get a huge increase of visitors within two weeks. It takes time before the search engines have indexed your knowledge base and have estimated its value.
With WPjournalist, it took a month before it started to benefit from this. And that is actually quite fast.
If you write about the right topics, you have a chance to score higher in Google. I will give you a few examples:

Another example:

After this, WPjournalist comes in at 4th on Google. Right behind the first three results of DesignMantic’s website itself. A great result of course.
 And well… I googled only a few articles, with fantastic results!
And there are probably more articles from the knowledge base that score high in Google.
WOW….
Obviously, a lot more tools will score high in Google. Which is something I will of course be figuring out in Google Analytics.
Conclusion
As a team, you are stronger than just you alone. The same goes for a knowledge base. The strength is in the togetherness.
If you connect all of the separate articles, you have a chance to score better in search engines.
It really takes some time to set up a knowledge base. It seems boring and time consuming, but at a certain point you will also begin to enjoy working on your knowledge base.
You learn a lot about a topic when you write about it a lot.
People will start seeing you as an authority if you know a lot about a certain subject. And they will also start approaching you for it.
I am very content with my knowledge base.
Have you yourself made a knowledge base? Let me know in the comments.


